 Save to Pinterest
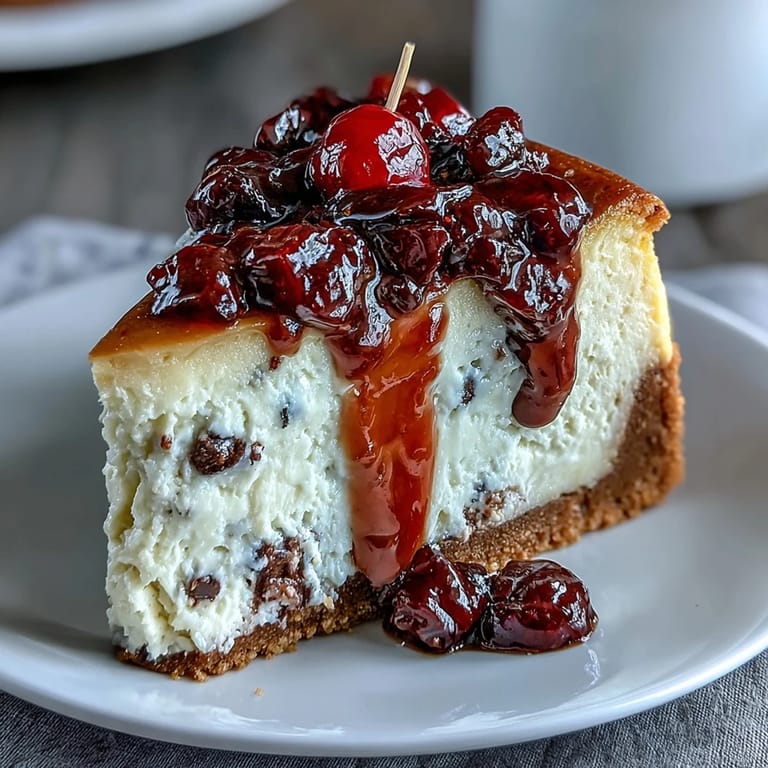
 My sister called me three weeks before her graduation asking if I could bring something to the celebration dinner—something that felt special but wasn't fussy to make. I'd been experimenting with mini cheesecakes in cupcake liners, and when she mentioned how much she loved creamy, tangy desserts, I knew exactly what to do. The idea of topping them with those little diploma picks made her laugh so hard over the phone that I decided right then: this would be the dish. When I finally made them that afternoon, the kitchen smelled like buttery graham cracker and vanilla, and I realized these weren't just bites—they were little edible celebrations waiting to happen.
I'll never forget watching my nephew carefully place each diploma pick into a cheesecake bite, then take a huge bite with the pick still sticking out, getting berry juice all over his graduation tie. Everyone laughed, and suddenly these weren't fancy appetizers anymore—they were memories being made right in front of us. That's when I understood why small, shareable desserts matter so much at celebrations: they bring people together in the most unpretentious way possible.
Ingredients
- Graham cracker crumbs: Toast them lightly if your crackers feel stale, and make sure they're fine and even—no huge chunks that'll poke through the filling.
- Granulated sugar: For both crust and filling, measure it out separately to avoid confusion halfway through.
- Unsalted butter, melted: Use real butter; the flavor difference in something this simple is honestly everything.
- Cream cheese, softened: Take it out of the fridge 30 minutes before mixing, or you'll spend forever beating lumps out of it.
- Large egg: Room temperature works best, and add it slowly so it blends completely into the smooth filling.
- Vanilla extract: A real bottle, not the imitation kind—it makes the whole thing taste like actual cheesecake instead of something vaguely sweet.
- Sour cream: This is the secret ingredient that makes the filling tangy and keeps it from being too dense.
- Fresh mixed berries: Whatever looks good at the market that day; just dice them small enough to sit on top without rolling off.
- Fruit preserves (optional): A little brushed over the berries adds shine and keeps them from drying out if these sit for a few hours.
Tired of Takeout? 🥡
Get 10 meals you can make faster than delivery arrives. Seriously.
One email. No spam. Unsubscribe anytime.
Instructions
- Set up your station:
- Preheat your oven to 325°F and line a 24-cup mini muffin pan with liners—I like to use my fingers to press them down firmly into each cup so they don't pop out during baking. This small step saves so much frustration later.
- Make the crust mixture:
- Combine your graham cracker crumbs with sugar and melted butter in a bowl, stirring until it feels like wet sand. It should hold together when you squeeze it, which is how you know you have the right ratio.
- Press crusts:
- Spoon about a teaspoon of crust mixture into each liner and press down with the back of a small measuring spoon or your thumb. Don't overthink this part—you just want an even, compact base about a quarter-inch thick.
- Pre-bake the crusts:
- Bake for just 5 minutes to set them, which keeps them from getting soggy later. They won't look or feel done, and that's exactly right.
- Prepare the filling:
- Beat your softened cream cheese and sugar together for about 2 minutes until it's completely smooth and creamy with no lumps. This is the one place where taking your time actually matters.
- Add wet ingredients:
- Mix in the egg slowly, then vanilla and sour cream, stirring until just combined—don't overmix or you'll incorporate too much air and get cracks on top. The filling should look silky and thick.
- Fill the bites:
- Spoon about a tablespoon of filling over each cooled crust, leaving a tiny bit of space at the top. A small ice cream scoop makes this fast and keeps portions even.
- Bake until set:
- Bake for 13 to 15 minutes—the edges should look firm but the very center should still jiggle slightly when you gently shake the pan. This is the difference between creamy and rubbery, so don't skip this observation.
- Cool in stages:
- Let them sit in the pan for 15 minutes, then transfer to a wire rack to cool completely. This gradual cooling prevents the dreaded cracks that come from temperature shock.
- Chill thoroughly:
- Refrigerate for at least an hour before decorating—ideally overnight if you have the time, because cold cheesecake is creamier and easier to handle.
- Top and decorate:
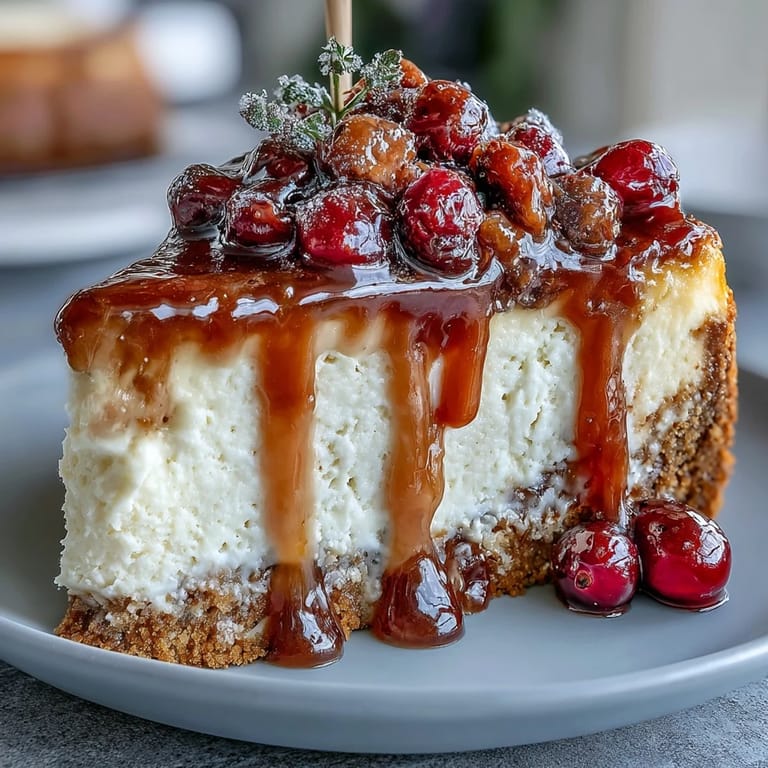
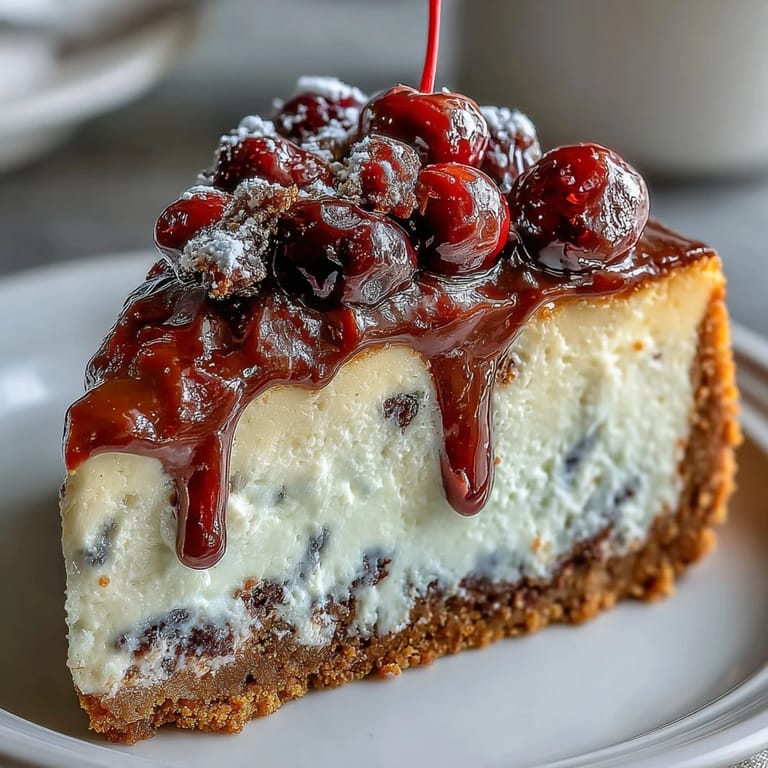
- Just before serving, add your diced berries to the top of each bite and insert the diploma picks at a jaunty angle. If you want to brush with warm preserves for extra shine, do that right before serving so everything stays fresh.
 Save to Pinterest
 There's something genuinely magical about a dessert that looks elegant but tastes like pure comfort. My mother-in-law, who normally just picks at desserts, ate three of these in a row and then asked if I could make them for her bridge club. That's when I realized these weren't just clever graduation party decorations—they were legitimately delicious bites that happened to be dressed up for the occasion.
Making Them Ahead of Time
One of the best things about these cheesecake bites is how well they work for advance preparation. You can bake everything the day before, store them in an airtight container in the fridge, and just add the berries and picks a couple hours before your event. I've found that they actually taste even better the next day—the flavors mellow and blend together overnight, and the filling becomes even silkier when it's properly chilled.
Variations That Actually Work
The beauty of this recipe is how flexible it is without compromising the cheesecake texture. A friend swirled in a spoonful of chocolate ganache before baking and changed everything about how it tasted, and another person told me she added a pinch of lemon zest to the filling because she wanted something brighter. I've experimented with different berry combinations depending on the season—in summer it's all raspberries and strawberries, but in winter I've topped them with pomegranate seeds or even candied cranberries.
Storing and Serving Tips
These keep beautifully in the refrigerator for up to three days in an airtight container, which is honestly longer than they usually last at my house. If you're transporting them to a party, pack them without the diploma picks and add those just before setting out the platter—they'll look fresher and the picks won't get knocked around in the car.
- Let them sit out for 10 minutes before serving to take the edge off the cold, which makes the cream cheese flavor pop.
- If you make these more than a day ahead, add the berries just a few hours before serving so they stay fresh and don't get weepy.
- The diploma picks add celebration, but you can skip them entirely if you're making these for a casual Tuesday night—they're equally wonderful either way.
 Save to Pinterest
 These cheesecake bites have become my go-to when I need something that feels special but lets me actually enjoy the party instead of fussing in the kitchen all night. They're proof that celebration food doesn't have to be complicated to be memorable.
Recipe FAQs
- → How do I make the graham cracker crust?
Combine graham cracker crumbs, sugar, and melted butter until evenly mixed, then press into mini muffin liners and bake briefly to set.
- → What ensures the cheesecake filling is creamy?
Beating cream cheese and sugar until smooth before adding egg, vanilla, and sour cream helps achieve a creamy, smooth texture.
- → How long should the cheesecake bites chill?
Refrigerate for at least one hour after baking to allow flavors to meld and texture to firm up properly.
- → Can I use gluten-free graham crackers?
Yes, substituting gluten-free graham crackers works well for a gluten-free version without altering the taste.
- → What is the purpose of fruit preserves on top?
Brushing fruit preserves over the berries adds a glossy shine and a subtle extra layer of sweetness.